

Organizing your kitchen can be an exciting & overwhelming event. Figuring out the best place to put each item will end up saving you a ton of time and effort as you move forward.

If your kitchen feels like it’s constantly getting messy no matter what you do, it’s probably not you — it’s the lack of a simple system. Join my 5 word challenge totally free to GET STARTED!
My Story of Overwhelm:
In 2011 I moved from a 1,100 square foot house in California into a 2,300 square foot house in Arizona. I was in absolutely BLISS over my new kitchen.
However, in looking for kitchen organization, I mostly just found information on baskets and bins (which we couldn’t afford after the move).
I did find a few gems, and I have started to make my own list as we’ve been here. Anything I wish I had done differently (or things I later thought were super smart) I’m excited to share them with you! Having an organized kitchen makes meal prep about 10 thousand times easier! 🙂
Looking for meal prep ideas – check these out:
- Mid-April Menu Plan
- Save More Grocery Money by NOT Menu Planning!
- August Menu Plan
- The Best Soups for Pregnancy
- Organized Recipe Binder
Organize Your Kitchen
Define The Kitchen Territories
Now, this didn’t matter as much when we had such a tiny kitchen in California. There wasn’t much territory to split up, but now that I have a larger kitchen with a circular flow around an island I needed to sort of split the kitchen into specific areas.
A note on small kitchens: I think zoning can help in ANY room regardless of the size. While “zoning” happens somewhat naturally (we put all the silverware in the same drawer) sometimes being a little more intentional with your thoughts about what is going where can help a lot.
I knew I needed:
- a baking area (as I make bread & cookies a lot)
- an oven use area
- and a dishes area.
{btw, don’t worry if these “zones” don’t fit you — I’ve got an awesome tip coming to find out what YOUR zones should be}
In order to make cooking (or life) easier, you need some ideas to get started — I bet you’ll agree!
If you’re looking for easier organization, stay tuned, I have a great helper for that!
Step 1: Create a Baking Area
(feeling like you have a good idea on what goes where, but not sure how to ORGANIZE it all — skip to here).
This is where you put your baking goods (obviously). I have a whole cupboard with flour, sugar, etc. Plus, all my baking powder, oil, chocolate chips are also around there. The majority of baking can happen in just that corner. Things that are great to keep in this area:
- Staples
- Your Mixer (both stand &/or hand)
- Measuring Cups/spoons.
Of course, things you don’t reach for often will be in another spot. This area should be available for the things accessed most frequently.
These are my favorite containers to keep staples in smaller areas (because you can buy them nice & tall — which helps with vertical organization).
Looking for more baking tips:
- Bread Hacks: Tips for better bread making
- 7 Layer Brownies in the Dutch Oven
- The Best Cookies: Expert tips to using your stand mixer
- Best Whole Wheat Bread Recipe
- Bosch Universal Mixer vs Kitchenaid Mixer vs The Nutrimill Artiste Mixer
These ideas are a great start — but if you want your kitchen to actually stay organized, you need a system that fits your real, busy life. That’s what I built The Organized Home for.
Step 2: Create a Dishes Area
One thing that has saved me a world of hurt is putting the dishes cabinet close to the dishwasher. It is SO much easier to load.
In my mind, I think I would have used one of the larger cabinets for this, which would have been a BIG mistake. I felt like the tiny cabinet that we had wouldn’t hold them all, but with some creative plate racks, it has totally worked! Also, the silverware is just behind it. This was super smart of me! #momwin
Creative use of dish space is a TOTAL MUST. Check out my before & After….
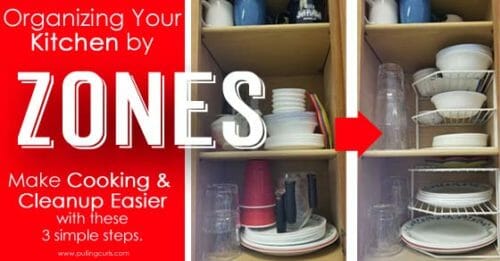
A few things that helped me to use a small cabinet for our main dishes:
- Plate racks — make it SO much easier than stacking on top of each other — especially for kids, who have a hard time taking out a huge stack of dishes.
- Corelle dishes are so thin (also helps in the dishwasher)
- Paring down our vast mug collection (my husband was a teacher and he always got tons of mugs)
Decluttering is one of the MOST important things you can do, don’t worry — I have some GOOD decluttering tips for your whole house coming up!

Step 3: Organize Your Cooking Area
This is an area for larger dishes that you use in the oven, and then platters to put things fresh out of the oven on. All of our Pyrex bakeware is in there.
The cake pans and cookie sheets are below the oven (just because it’s a great place to store them).
My spices are also there — makes them easy to get when stirring stuff on the stove.
I have a little container (like this one) that keeps all my often-used spatulas and whisks close at hand, then the rest of those items are in a drawer just to the side of the stove. I think it’s super handy to have that as I cook.
I also have the most INSANE cupboard to the right of my stove. That’s right in a corner and SO deep (which I talk about in this post on awkward corner cupboards).
Oh man SO many kitchens have awkward (but useful) storage space — so HOW do you make it work, right? Don’t worry… I have the key.
A little organization in the kitchen goes a long way. It will save you steps when you’re cooking dinner as well as brainpower when things are just within arm’s reach.

Looking for more organization posts:
- Zoning Your Kitchen
- Decluttering Your Kitchen
- Kitchen Sink Organization: The big tips making dishes easier!
- How to Clean Your Kitchen: Cleaning in Circles
- Kitchen Redesign – Episode 083
A few good ideas can help — but having a clear plan for your whole kitchen is what makes it stick. That’s exactly what you’ll find inside The Organized Home.
Where to start?
A lot of people just have no idea where to start organizing. But, here’s my truth bomb.
TRUTH BOMB: It really doesn’t matter where you start (literally, like — there’s no WRONG place to get going) — that’s an excuse your brain is making to not get started.
Are you reading this post thinking — gosh these seem like great ideas, but I have NO idea where to even start!
I know this feeling SO well!
I, personally, feel SO overwhelmed when I see organizing on social media, or on TV because it seems like SO much (and SO expensive) — for a long time I had no idea where to start in my own home. I feel overwhelmed, immediately exhausted and I want to set it all on fire.
The good news is that organizing is addicting. Once you realize how much easier you’ve made one part of your house, it’s a lot easier to skip Netflix for an hour and do something productive (and then enjoy some Netflix).
Don’t let that overwhelmed feeling stop you — let’s do it together. and it didn’t require a huge budget or a perfect house. I put that exact step-by-step system inside The Organized Home so you can finally start (and actually finish)
Not sure you’re quite ready for the full course. Come join me in the totally free 5-word organization challenge!


Eugenia R says
As I read your tips for organizing the kitchen, I realized that my small galley type kitchen is also divided into zones too. Breakfast products are together, baking and cooking products combined in another cupboard, utensils in drawer close to stove, etc. I just reorganized the cupboards today and so feeling fairly pleased with myself for being so inspired by the Getting Organized HQ sessions I watched all last week. Baby steps as they say! Thanks for sharing your tips and suggestions for an organized kitchen.
.
Hilary Erickson says
I think it’s actually, mentally, an easy way to do it — but sometimes our minds get cluttered with great organization ideas…. we get confused. 🙂
Robin Knoll says
In my kitchen most of what you suggested sounds great but does not work in my kitchen but thank you for your suggestions anyway.
Asha Nikte says
If you don’t have organiser you can keep dishes one upon another by keeping either tissue paper of bubble plastic in between 2 dishes or bowls saucers
Gale says
Helpful article! I don’t Intend this to sound negative, because I recently looked this up as my drawer gets so hot. Did you know that the bottom drawer isn’t intended as storage in most stoves? You need to check your owners manual. In my gas oven it’s a broiler and gets super hot during baking. In many others it’s intended as a warming drawer. If you have a model that is a storage drawer, the heat still isn’t good for spices, and nothing flammable should be stored there. Fires have been started by storing stuff in drawers. All these years I thought it was just for pans, but no. Thanks for the organizational tools.
Hilary Erickson says
I store only baking pans in mine, mostly cookie sheets…. but I agree, totally not great for spices!
Robin Knoll says
That is correct! Mine is a broiler. BUT as far as storing spices near the stove/oven… she may want to read up on that because heat breaks down your spices and they are not as useful for cooking.
Joy says
Should glasses be stored upright or bottos up? I store mine bottoms up while my cousin stores her upright. It drives me crazy. Id really appreciate another opinion.
Pulling Curls says
I think this is a personal preference for everyone. I just recommend making sure cups are completely dry if you choose to store them top down so moisture isn’t trapped inside.
Mia says
I don’t like the smell that comes from the shelves (no matter HOW CLEAN the shelf is) when glasses are stored bottoms up. It TOTALLY turns me off to drink out of them..! When I grab a glass, I handle it around the outside, so no fingers in the glass..! .
Hilary Erickson says
Interesting!
Penny says
Me too! Every article I have ever read says to store them upright.
Pam says
Bottom up is how I store my cups & glasses .
Mary Aubuchon says
Would love to learn how to organize my home
Pulling Curls says
So glad you’re here!
Emily says
Would anyone be bold enough to post a photo of the inside of the cabinets? A picture of the kitchen with the cabinets open for a visual reference/idea? I moved from a smaller kitchen to a larger one and feel like a chicken running all the time from one end to the other with things.. Thanks for any help!
Hilary Erickson says
I have some real life pictures in here, but I also have a LOT more in my course The Organized Home: https://www.pullingcurls.com/organized-home-course/
Jane Teasly says
Great post! I think I do good in step 1. My baking area is usually tidy. But, I do not do good at steps 2 and 3. I am so cluttery in fact that my husband told me I am not allowed to start cabinet painting until I declutter. I am excited to try some plate racks. I will have to choose some mugs and large dishpans to give away or throw out. I know for sure I have 2 dish pans that are as old as my mother and I probably shouldn’t still have them. Thanks for the tips and tricks.
Pulling Curls says
Thanks so much. I do think getting rid of things and minimizing what we have really does help a lot. Best of luck on the cabinet painting.
Shelby says
These kitchen organization tips are super helpful, this will help a lot after our tile cleaning this week. I can’t thank you enough!
Pulling Curls says
I’m so glad you found it helpful!
Cheryle says
We recently had a cabinet refinishing job done for our kitchen cabinets, they look gorgeous now but I realized how badly organized they are! Thank you for sharing, I forgot about zones and I’m excited to put that into practice!
Pulling Curls says
I’m so glad that you’re excited to put zones into practice. Thanks for taking the time to comment.
Ginger says
What works for one, doesn’t work for all. FYI. Don’t everyone get your hopes up.
Pulling Curls says
I definitely agree that what works for one person doesn’t work for everyone. I do believe the tips I share in this post are ones people can easily customize for what works for them 🙂
Marie says
Glad I found you through search on Pinterest. Just had my kitchen redone after a plumbing break and wanted to start fresh. Love your ideas and looking forward to seeing them in my kitchen
Pulling Curls says
I love hearing this! Can’t wait to hear about your successes 🙂
Shelby says
Great tips! We’re just had cabinet refinishing done in our kitchen, so we will start to implement these tips now!
Pulling Curls says
Can’t wait to hear how you like it!
Rebecca Pennington says
Well, we are moving December 1st this year. So, I get to throw out things I’m not using now. Because there’s no need to keep anything I’m not using, cooking with, wearing, or decorating with any longer.
I’m excited to be shedding ALL that extra STUFF I’ve been hoarding. Except for the shadow boxes my grandpa made.. I have a new use for them. They’re going to be sectional pieces holder for my sewing.ive outgrown my grandmother’s sewing box.
Pulling Curls says
I love purging things and a move is the perfect time to do that! That’s awesome that you’ve found a new use for something special 🙂
Eilen says
Re the debate about correct way to store glasses and mugs. I store mine bottom up. That way the less often used items don’t lose there gloss when you get them out for occasional use – say when you have a family group round.
Before I stored top up and would then need to rewash before using.
Hope this helps if anyone still undecided.
Re previous comment about putting fingers in drinking vessels: this is horrible and I cannot enjoy drink if I see this happening. Do not understand why some think this is appropriate behaviour!!
Irene Madrid says
I LOVE changing out my quilts and pillows in FOUR bedrooms so I soon found out that my idea for big plastic bins stored in the 3 car garage , wasn’t working. So now, I found these tall large self racks….and I hope the hands,man can figure out how to put it together. If it works , I will get more. I need large shelves for my king quilts, blankets , and I think the pillows can stay in bins. I plant to drape old sheets over the top of the big racks.
Wish me luck.
Pulling Curls says
GOOD LUCK!!!
Wendy Gordon says
I’m remodeling my small kitchen and will have TONS more storage space AND a pantry! I’m thinking about where I’ll put stuff after the remodel to be most efficient. Your mention of storing the colanders near the sink is genius! Duh! Currently, I’m constantly having to go to a distant cupboard to retrieve one!
Add me to the “bottoms down” glasses storage camp.
Hilary Erickson says
Sometimes it just takes a reminder that something else would be better. 😀
Pam Torres says
Because I’ve lived in very tiny apartments for many years I had to be very creative to make space in my kitchen. One trick that works great for me for plates is using the lids organizer and putting plates in vertical position instead of flat. You won’t have empty spaces in between and can use the whole area. And is much easier put in or take out. And hanging all my small measuring cups in the inside side of cabinet door is a win win. Always at hand just by the stove. Just some extra ideas.
Hilary Erickson says
These are great ideas! Thank you! Every spot is so unique, I think sharing what works for US is so helpful!